Guitar Technique Tip of the Month
Your Personal Guitar Lesson

Contact Me
Do you have a question?
Comment?
Suggestion for the website?
PDFs and Video Downloads
You may download a PDF version of this technique tip.
Download Interval and Chord Balance, Part 1 of 4
Note: You must have Adobe Reader 10 or later installed on your computer to play the videos contained in the PDFs. Download Adobe Reader here.
INTERVAL AND CHORD BALANCE PART 1 of 4
By Douglas Niedt
Copyright Douglas Niedt. All Rights Reserved. This article may be reprinted, but please be considerate and give credit to Douglas Niedt.
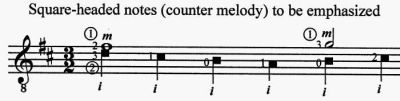
An important right-hand technique to learn is that of being able to independently control the volume of each note of an interval, triad or chord. The highest note of an interval or chord (which is the easiest for most players to bring out loudly) is not always the note that should sound the loudest. For example, in the well-known Pavane for a Dead Princess by Maurice Ravel, the melody is played on the second string in the following excerpt:
Example No.1:
Measure 13. Pavane for a Dead Princess by Maurice Ravel (arr. Niedt)

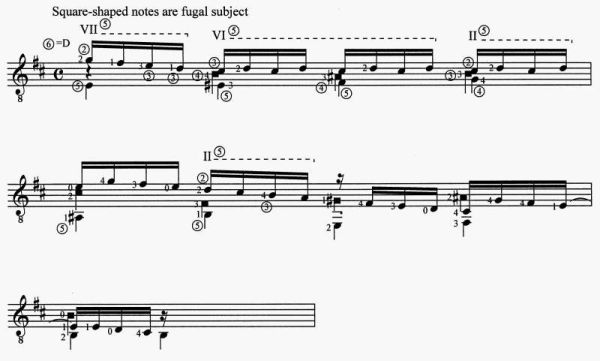
It is essential that the player be able to play "m" quite a bit stronger than the other fingers to bring out the melody line on the second string. Another example is found in the Fuge from J. S. Bach's Praludium, Fuge, and Allegro. In example No. 2 the subject, which is to be brought out very clearly, is between two outer voices:
Example No.2:
Measures 43, 44. Fuge, From Preludium Fuge and Allegro by J.S. Bach (BWV 998)
Or, in Luis Milan's Pavana No.2 we have a melodic theme stated in this phrase:
Example No. 3:
Measures 3-5. Pavana No.2 by Luis Milan

The theme is then repeated in inner voices as:
Example No. 4:
Measures 11-15. Pavana No.2 by Luis Milan

Therefore, to play a piece musically and intelligently, it is important that a player be able to bring out any note of an interval or a chord at will. To take a simple, down-to-earth example, a song such as Down in the Valley could be played in two voices with harmony below or above the melody:
Example No. 5:
Down In The Valley, Melody in upper voice.

Example No. 6:
Down In The Valley, Melody in lower voice.

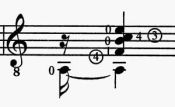
Example No.5 with the harmony below the melody is the most common situation, where we must bring out the upper voice (melody). Example No.6, though less common, does occur, for instance in Luis Milan's Pavana No.6:
Example No. 7:
Measure 17. Pavana No.6 by Luis Milan.
In this type of situation it is fairly difficult to bring out the lower voice louder than the top voice. Of course one could use the thumb to play the lower voice to aid in bringing those notes out louder, but this is often not practical for technical or musical reasons (for example the thumb may not produce the desired tone quality).
A note may need to be brought out or emphasized for many different reasons, not only because it is a melody note or note of a fugal subject, etc. Often a chord serving solely an accompaniment role having no melodic importance can be made to sound like a totally different chord depending on how it is balanced. For example, the following chord occurs in measure No. 6 of Prelude No. 4 by Heitor Villa-Lobos:
Example No. 8:
Chord from measure 6. Prelude No. 4 by Heitor Villa-Lobos
This chord will sound completely different depending on which note or notes are emphasized. In impressionistic music, which often uses colorful variations of sixth, ninth, eleventh, and thirteenth chords, the player may color the music with striking results by balancing the chords in certain ways.
To work on balance control let us begin this month by working with intervals. All the following exercises are to be practiced with free stroke. Hold down the note "d" on the second string third fret with the third finger and the note "f" on the first string first fret with the first finger.
Play the Notes Separately
Begin by playing the notes separately, not as an interval. With the right hand play the second string with "p" and the first string with "m". Try to play the "d" very softly so it can barely be heard and play the "f" very loudly almost to the point of making the tone distort. When the thumb plays, just barely brush the string. And then pull the first string very heard with "m". Play the two notes so that they sound closer and closer together until they gradually sound simultaneously as an interval.
Pre-Plant and Pre-Pull
Another practice method that is usually necessary to learn this technique is to plant the thumb very lightly on the second string, just barely touching it. Plant "m" on the first string and pull the first string very hard until the first string is almost touching the second string. Remember, volume is mostly produced by how far a string is pulled before it is released. And be careful that when the first string is pulled back with "m" that "p" does not also begin to push on the second string. Keep "p" resting very lightly on the second string. Also notice the feel of "p" and "m". The thumb is very relaxed and resting lightly on the second string while "m" is pulling the first string very hard and you can feel the pressure of the string as it bites into the "m" finger. Finally, simply release the first string while lightly brushing the second string with the thumb. Practice this several times a day feeling the independent motions and feelings in the thumb and finger.
No Pre-Plant. No Pre-Pull.
Eventually, once the fingers get the feel of the technique, try to capture this same feeling without pre-planting the finger and thumb on the strings. Once again, try to retain that feeling of "m" pulling the string hard while "p' just brushes (or even tries to avoid playing) the second string.
And Reverse
Now, reverse the balance. Try bringing out the second string as loudly as possible to the distortion point and the first string very softly. The same practice principles apply here. Begin by playing the notes separately. Play "p" very loud and then follow quickly with "m" brushing the first string. Gradually play the notes closer together until they sound simultaneously as an interval.
If you are still having difficulty, rest "m" lightly on the first string and push the second string hard with "p" until the second string almost touches the first string. Again, be careful that when "p" pushes on the second string that "m" does not start pulling on the first string. Keep "m" resting lightly on the first string. Then release the second string while very lightly brushing the first string with "m". And once again, remember how the strings feel against the thumb and finger. Keep planting the finger lightly on the first string and pushing the second string with the thumb until you think you have the knack of it.
Push With Wrist and Arm to Emphasize Thumb
Then try playing without planting. It might be noted here that the thumb is also easily brought out loudly if you push with the wrist and arm as the thumb plays. This weighty, pushing motion towards the floor has the effect of negating the movement of "m" upwards towards the ceiling. However, this heavy pushing motion with the wrist and arm is usually reserved for use only when an exceptionally heavy bass line or accent is desired. Also be sure to practice both of the above exercises with "p" and "i" and "p" and "a" as well as "p" and "m". We began with "p" and "m" because they are the easiest to control.
If practiced correctly, the player should be able to perform these two exercises within a few weeks. Once the extreme dynamic contrast is achieved (barely playing one note and playing the other note loud to the point of distortion) practice less extreme balances--the first string forte and the second piano; the first string forte and the second mezzo-piano, etc. And finally, play the first string fortississimo (fff) and the second string pianississimo (ppp), and then crescendo the second string to "fff" while decresendoing the first string to "ppp" and then reverse so that you can produce any desired balance between two strings, one played with the thumb and the other with either "i" "m" or “a". Try all these exercises on different strings (not always adjacent strings) and in different registers of the fingerboard. A different touch is required on different registers because of the different string diameters and string tensions involved.
Now, With Two Fingers, No Thumb
The following week, using the same practice procedure described above, play the first string with "m" and the second string with "i". You will find balance control much more difficult when using just the fingers as opposed to a finger with the thumb. And again, the technique of pulling the string that is to sound the loudest hard with one finger while lightly planting the other finger on the other string and then releasing the loud string while brushing the soft string is very helpful. Also work with "m" and "a" and with "i" and "a". Then try playing the two versions of Down in the Valley (examples 5 and 6) with all the finger and finger-thumb combinations. And finally, look through the music in your repertoire for passages of intervals and work on producing just the right balance between the notes for each phrase. The balance that you choose will vary according to the musical context, historical period, tempo, texture, etc.
Therefore, in just a few weeks the player should be able to control the balance between any two strings, the upper string played with "i", "m", or "a" and the lower string with "p"; or two strings played with "i" and "m", "m" and "a", or "i" and "a".
Next month we will work with controlling the balance of three and four-note chords.
PDFs and Video Downloads
You may download a PDF version of this technique tip.
Download Interval and Chord Balance, Part 1 of 4
Note: You must have Adobe Reader 10 or later installed on your computer to play the videos contained in the PDFs. Download Adobe Reader here.