Guitar Technique Tip of the Month
Your Personal Guitar Lesson

Contact Me
Do you have a question?
Comment?
Suggestion for the website?
PDFs and Video Downloads
You may download a PDF version of this technique tip.
Download Fast Scales With ami
Note: You must have Adobe Reader 10 or later installed on your computer to play the videos contained in the PDFs. Download Adobe Reader here.
HOW TO PLAY SUPER FAST SCALES WITH ami
By Douglas Niedt
Copyright Douglas Niedt. All Rights Reserved. This article may be reprinted, but please be considerate and give credit to Douglas Niedt.
Would you like to do this? Watch video clip #1:
You can do it. Read on.
Many years ago, I participated in a master class given by the great Spanish guitarist, Narciso Yepes. The subject came up of how to execute fast scales. Yepes told us a story about his studies with George Enescu.
Enescu was a Romanian composer, violinist, pianist, and conductor. Yepes worked with Enescu on J.S. Bach's famous Chaconne. Because Enescu was a violinist and the Chaconne was written for the violin, he had very specific ideas about how the piece should sound. Enescu didn't like the way the scale passages sounded on the guitar. Yepes was using the traditional "i" and "m" alternation. He did some scales free stroke, some rest stroke. Enescu told him the scales were too punchy, too "tak-a-tak-a-tak-a." They needed to sound smoother and less accented. Ideally, Enescu wanted Yepes' scales to sound the way a violinist's would sound, playing a group of 4–8 or more notes in one bow stroke, the next 4–8 or more notes in the next bow stroke, etc.
Yepes said he went home and for weeks experimented with new approaches to playing scale passages. He finally came up with the idea of using the repeated pattern (usually rest stroke) of "a" "m" "i". Enescu liked the new sound. Now that the accented plunkiness of the traditional "i" and "m" technique was removed, the passages sounded very musical. He thought the new technique provided the smooth fluency required in the scale passages of Bach's Chaconne. Quite a compliment from a violinist! By the way, Yepes also discovered he could achieve equal or greater velocity with his new technique with less effort, than the traditional "i" and "m" technique.
HOW TO DO THE PATTERN
The pattern, "a" "m" "i" is usually done rest stroke. When possible, anchor the right-hand thumb on the guitar or a bass string for stability and as a spatial reference point. (See my Tech Tip, Anchor Fingers).
For maximum speed and control:
1. Be sure to stay as close to the string as possible.
2. Because this is rest stroke, each finger comes to rest on the adjacent string. Lift each finger off its resting point just far enough to prepare for the next stroke. Do not lift off the string, up, and around in a circular movement—lift the finger back to position by the most direct straight route possible.
Watch this stunning video (video clip #2):
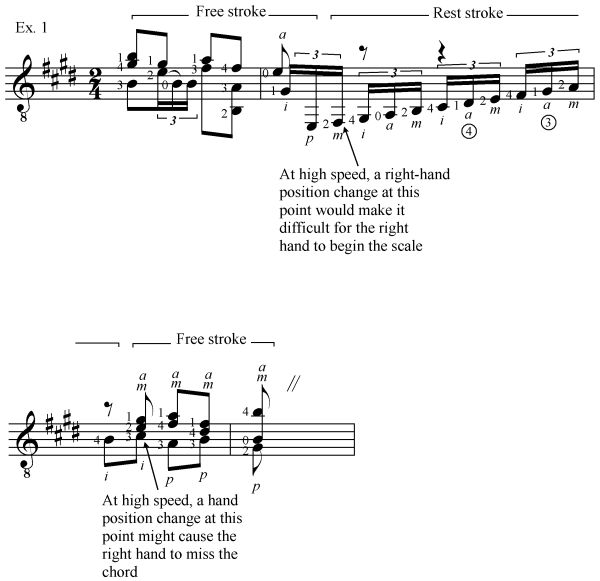
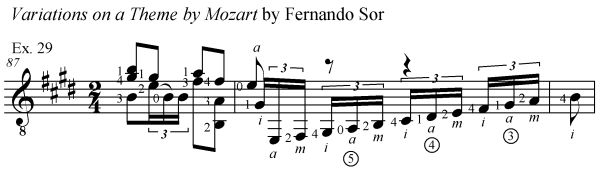
3. Depending upon the tone quality desired, and the length of your fingernails, whenever possible, lean the hand back to lessen string resistance. This can be difficult to do and is a bad idea if the last note of the scale leads directly into notes played free stroke—the hand position change would be disruptive. The ending scale in Fernando Sor's Variations on a Theme by Mozart, op.9 is a good example:
Watch video clip #3:
Control of tone quality:
Varying the lean of the hand and angle of attack of the fingers also changes the tone quality. An upright hand position produces a brighter tone. Leaning the hand back produces a darker tone. Playing straight across the strings in either position produces a brighter tone. "Slicing" the strings in either position produces a darker tone.
Watch and listen carefully (video clip #4):
Two methods of finger alternation and movement:
The movements of the three fingers can be managed in two ways. Let's say we are plucking the first string.
Here is Method #1:
- All three fingers are lined up precisely in front of (not above) the string, no more than 1/4 inch away.
- "a" plucks the first string and comes to rest against the 2nd string. "i" and "m" should not have moved one bit from their position! "a" remains resting on the 2nd string.
- "m" plucks the first string and comes to rest against the 2nd string. "i should not have moved one bit from its position. "m" and "a" are both now resting on the 2nd string.
- As "i" plucks the first string and comes to rest against the 2nd string, both "m" and "a" lift off the 2nd string together as one unit. They do not lift upward. They lift as directly forward (toward the floor) as possible to position themselves back at their starting position no more than 1/4 inch in front of (not above) the first string.
- As "a" plucks the first string and comes to rest again the 2nd string, "i" lifts off the 2nd string. It does not lift upward. It lifts as directly forward (toward the floor) as possible to position itself back at its starting position no more than 1/4 inch in front of (not above) the first string.
Watch this gripping video clip #5):
Or, here is Method #2:
- All three fingers are lined up precisely in front of (not above) the string, no more than 1/4 inch away.
-
"a" plucks the first string and comes to rest against the 2nd string. "i" and "m" should not have moved one bit from their position! "a" remains resting on the 2nd string. Those steps are identical to Method #1.
The next step differentiates Method #2 from #1:
- As "m" plucks the first string and comes to rest again the 2nd string, "a" lifts off the 2nd string. It doesn't stay there until "i" plays. THAT is the difference between the methods. As always, "a" does not lift upward. It lifts as directly forward (toward the floor) as possible to position itself back at its starting position no more than 1/4 inch in front of (not above) the first string. "i" has not moved.
- As "i" plucks the first string and comes to rest again the 2nd string, "m" lifts off the 2nd string. As usual, "m" does not lift upward. It lifts as directly forward (toward the floor) as possible to position itself back at its starting position no more than 1/4 inch in front of (not above) the first string.
- As "a" plucks the first string and comes to rest again the 2nd string, "i" lifts off the 2nd string. "i" does not lift upward. It lifts as directly forward (toward the floor) as possible to position itself back at its starting position no more than 1/4 inch in front of (not above) the first string.
Watch this spine-tingling video clip #6:
A prerequisite for control and evenness
A difficulty of using this technique effectively is that instead of producing rhythmically-even streams of notes, it can degenerate into uneven "gloppy" groups of threes.
The most common cause of the unevenness is lack of independence between "m" and "a". For this technique to produce rhythmically-even scales, you must first develop independence between those two fingers. I describe how to develop this independence (which is also essential to producing rhythmically-even arpeggios and an even tremolo) in a previous tech tip. In a nutshell, my recommendation is to practice two "m" and "a" arpeggio patterns on a very fun piece called El Abejorro by Emilio Pujol.
Listen to me play El Abejorro. (A separate window will open that you can minimize in order to still see the written musical example as you listen.)
Without "m" and "a" independence, you will not be able to play scales evenly with this technique.
HOW TO PRACTICE
To learn the "ami" scale technique, begin by practicing on the 2nd or B string. If you practice on the 1st or E string, your fingers will tend to make their movements too big. Practicing on the B string naturally restricts the movements of the fingers since you have the "boundaries" of the 1st string and 3rd string in front and behind them.
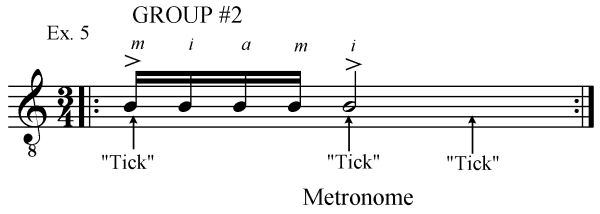
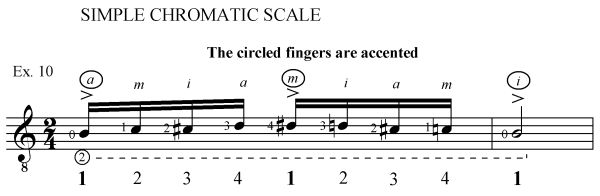
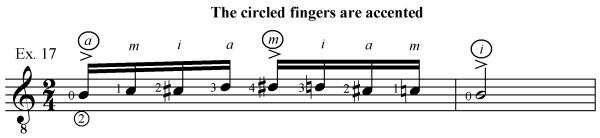
The key to developing the rhythmic evenness of this technique is to practice in groups of four rather than three:
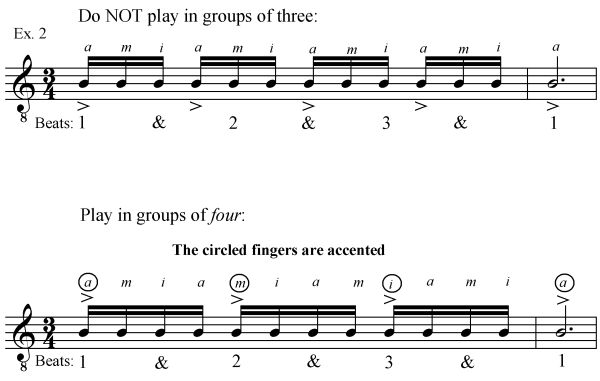
Accent the beats strongly to feel the groups of four. Notice the finger pattern of the accented notes: "a" plays the first accented note, "m" plays the second accented note, "i" plays the third accented note, and "a" plays the final downbeat. Practice on a variety of pitches on the B string so the fingers get used to different string tensions.
At first, practice without a metronome just to learn the pattern and accents. Because you are practicing groups of fours, your fingers may want to switch over to the four-note pattern "amim" instead of maintaining "ami". Monitor yourself closely! It will be helpful to name the finger out loud that plays the accented note. At first, it can be hard to talk and play at the same time, but you'll get the hang of it after about 10-15 minutes. I also recommend that you count out loud, 1 2 3 4 1 2 3 4.
This video will be showing at Cannes this summer. Watch (video clip #7):
Your very best friend, the metronome
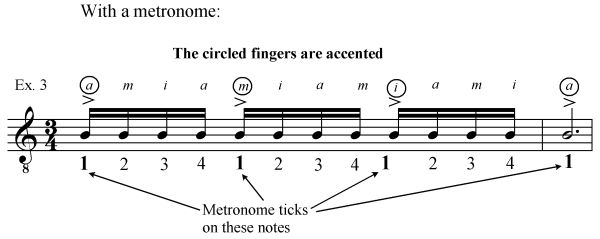
Once you have mastered that, try it with a metronome. Set the metronome at 60 bpm and play four notes per tick. Name out loud the fingers playing on the ticks. Count out loud 1 2 3 4 1 2 3 4 with the "1" on the tick. Again, be careful your fingers don't revert to "amim".
Try to stay awake. This video will take your breath away (video clip #8):
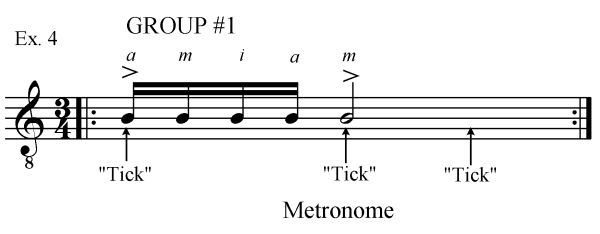
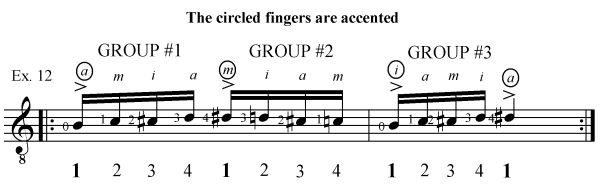
If you are having difficulty with the metronome, try executing just the first group of four (which starts with the "a" finger) plus a downbeat:
Once you are comfortable with that, try the next group of four (which starts with the "m" finger) plus a downbeat:
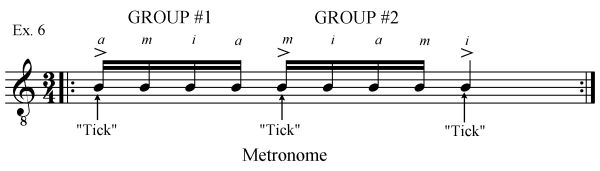
Now, knit the two together:
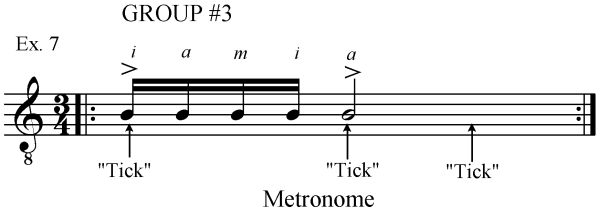
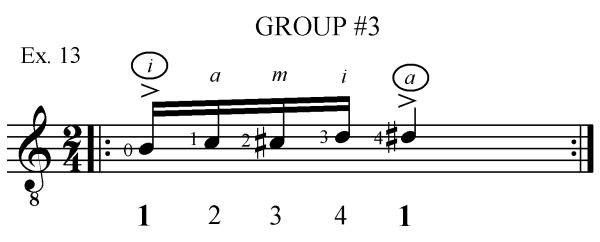
Now, try the final group of four (which starts with the "i" finger) plus a downbeat:
Knit groups #2 and #3 together:

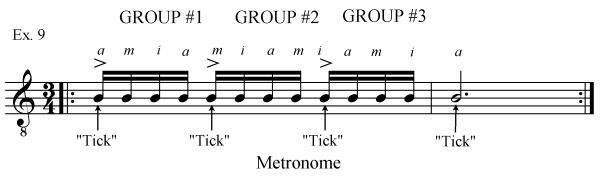
Once you can play all three groups plus a downbeat, you've got it:
Watch as I demonstrate in video clip #9:
Over a period of a few weeks, practice with the metronome beginning at 60 every day. Work up to a faster speed each day in 5-beat increments until you can go from 60-100.
For example:
Day 1-3: 60
Day 4-6: 60, 65
Day 7-8: 60, 65, 70
Day 9-10: 60, 65, 70, 75
Day 11-14: 60, 65, 70, 75, 80
Day 15-19: 60, 65, 70, 75, 80, 85
Day 20-21: 60, 65, 70, 75, 80, 85, 90
Day 22: 60, 65, 70, 75, 80, 85, 90, 95
Day 23-27: 60, 65, 70, 75, 80, 85, 90, 95, 100
The number of days spent on each range of speeds will vary from person to person. The increase in speed ranges will also vary. Some players may only but able to increase their speed a little bit each day. Others may make large improvements in speed one day and reach a plateau for a few days.
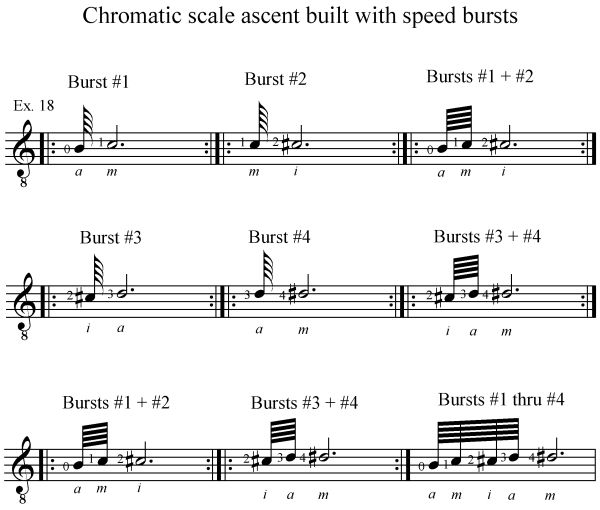
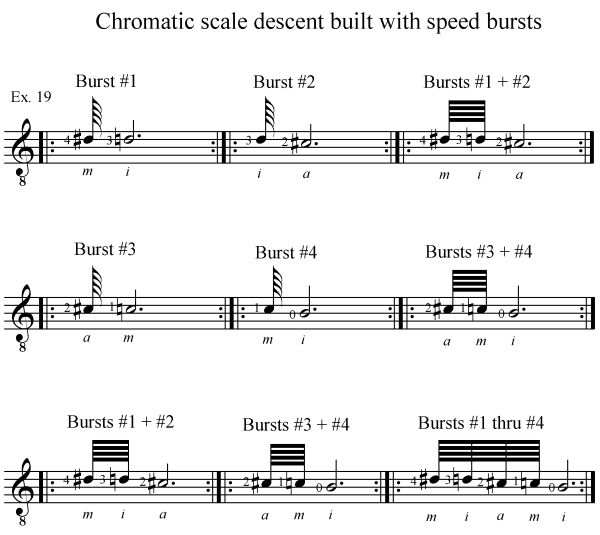
Speed bursts
Once you have reached the 100 mark on the metronome, it's time to turn to speed bursts. These are done without a metronome. In a speed burst, groups of notes are played as a single reflex with little conscious thought. For the "ami" scale technique, we will work with bursts of 5 notes (our group of four notes plus a downbeat).
Here's how to do it:
- Play the first burst of "amiam" two or three times slowly and consciously. You are telling the fingers, "Okay guys, this is what we are going to do."
- With little conscious thought or effort, play the burst of five notes as fast as you can possibly play. Think of it as flipping a switch and the fingers playing automatically as a reflex.
- Rest for a count of three. Relax your fingers. Shake them out.
- Do the burst again.
- Relax for a count of three.
- Do the burst again.
- If the burst begins to fall apart, play the burst slowly again to explain to the fingers, "Okay, once more. This is what we're doing."
- Do the burst again.
- Continue this regimen for about five minutes.
- Take a break. After five minutes, there is a danger that you will begin to try to make the burst work, instead of allowing it to work. Your muscles will tense up. Once that happens, your playing will get worse and worse. TAKE A BREAK. Stretch and shake out the fingers.
- After your break, begin again.
Watch the practice procedure in video clip #10:
Once the single burst is learned, try two bursts, three bursts, then four.
This is how to do it. Watch video clip #11:
Again, these bursts, even the longer ones, should feel like one fluid gesture, or one movement, or a reflex. They should require little effort physically or mentally from you.
Speed burst practice has several wonderful benefits to commend it.
-
You are learning to play a group of very fast notes with little conscious mental or physical effort. The passages are developed as reflexes in a state of relaxation. Working with a metronome at high speed tends to make one "try" to keep up with the machine. You and your muscles get tense "trying". In speed bursts, the fingers effortlessly toss out the burst of notes.
You learn the passage from the standpoint of effortless relaxation rather than teeth-gnashing effort.
That way, when the passage is played within the context of the piece, you won't say, "Oh man, here comes that difficult fast scale. I'm going to try hard as I can to push through it to keep up my tempo." Instead, you won't give it a second thought. In fact, you can slightly distract yourself from even thinking about so the fingers can execute the passage as a reflex with little conscious input from you. - You develop near 100% accuracy. Speed burst practice is always begun with small groups of notes that can be played perfectly. If it isn't perfect, the number of notes is reduced until perfection is attained. Then, one by one, the notes are added back in. More on this later when we add the left hand.
- When practicing in speed bursts, you will be playing the passages faster than required by the actual music. When played at the actual tempo of the piece, the passages will seem effortless to play.
- Instant gratification. With a metronome, increasing the speed notch by notch, you can learn a fast scale that covers several measures, over a period of a few weeks, sometimes a month or two. With speed bursts, the same scale can oftentimes be learned in minutes with total accuracy and ease. Other times, it may take a few hours, but certainly no more than a few days.
ADDING THE LEFT HAND
To add the left hand into the mix, begin with this chromatic scale:
At first, play slowly without a metronome. Once again, because you are practicing groups of fours, your fingers may want to switch over to the four-note pattern "amim" instead of maintaining "ami". Monitor yourself closely! Name the finger out loud that plays the accented note. With both hands playing, it will be even more difficult to talk and play at the same time, but keep practicing until you can do it. Be sure that you also count out loud, 1 2 3 4 1 2 3 4.
If you are unable to do this, break the scale into Group #1 and Group #2. Practice each group individually. Then, try knitting them back together again:

You now have one complete cycle.
Here's how to practice. Watch video clip #12:
Then, try the full cycle and add the next group of four (Group #3) plus a downbeat:
You may need to practice Group #3 by itself:
Now, knit those first three groups together.
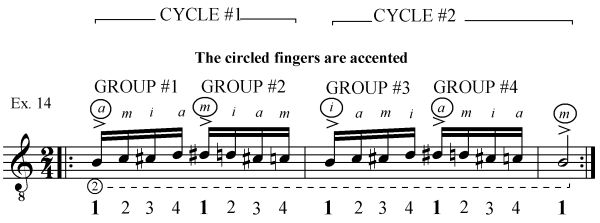
Next, play the full cycle, Group #3 that you just added, plus the next four notes (Group #4) plus a downbeat. You now have two full cycles of the chromatic scale pattern:
If you get tangled up in a group of notes, do more practice on that individual group. You have just two more groups of four to add (Group #5 and Group #6):

As above, extract the new groups and practice them by themselves. Then, plug them into the pattern.
You have now done three full cycles of the scale, which puts you back where you started: playing the open string with "a".
Once you can do the three cycles, you've got it. Then, try this to get the right hand used to differing string tensions:

Watch the entire process in video clip #13:
PART 2
Last month we began practicing the “ami” rest stroke pattern to execute fast scales. We focused primarily on the right hand but ended with a chromatic scale introducing the use of the left hand. This month we will focus on integrating the left hand with the right hand and look at how the technique is used in actual repertoire.
The “ami” rest stroke technique can be used for a variety of scale passages to produce different musical effects. It is also used in some specialty pieces. As a tease, here is a passage from Salvador Bacarisse’s Passapie.
Watch, this is fun (video clip #14):
Speed bursts, both hands together
Remember, speed bursts are done without a metronome. In a speed burst, groups of notes are played as a single reflex with little conscious thought. For the "ami" scale technique both hands together, we will work on a short chromatic scale on the second string with bursts of 2-9 notes.
This is the 9-note burst we will learn:
Here's how to do it.
- Play the burst two or three times slowly and consciously. You are telling the fingers, "Okay guys, this is what we are going to do."
- With little conscious thought or effort, play the burst as fast as you can possibly play. Think of it as flipping a switch and the fingers playing automatically as a reflex.
- Rest for a count of three. Relax your fingers. Shake them out.
- Do the burst again.
- Relax for a count of three.
- Do the burst again.
- If the burst begins to fall apart, play the burst slowly again to explain to the fingers, "Okay, once more. This is what we're doing."
- Do the burst again.
- Continue this regimen for about two minutes.
- Take a break. After just a few minutes of bursts, there is a danger that you will begin to try to make the burst work, instead of allowing it to work. Your muscles will tense up. Once that happens, your playing will get worse and worse. TAKE A BREAK. Stretch and shake out the fingers.
- After your break, begin again.
Watch me demonstrate the speed bursts in video clip #15:
If you are unable to do the burst cleanly, break it down into smaller bursts. You might have to break it into two-note bursts, then three-note bursts, four-note-bursts, etc., until you have built the complete burst.
Here is how we could build the ascent:
Watch me demonstrate in video clip #16:
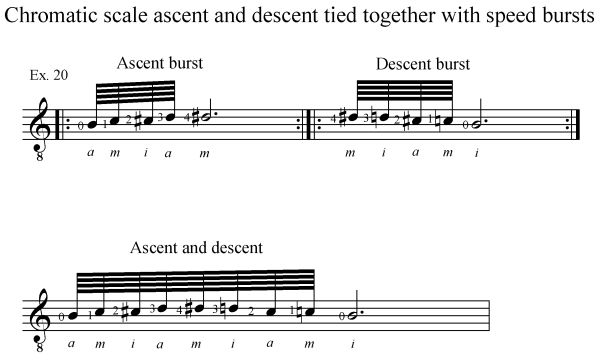
Then, we build the descent:
Finally, we put the ascending burst and descending burst together:
Watch video clip #17:
String Crossings
To the best of my knowledge, Narciso Yepes was able to do string crossings within the “ami” pattern. For example, he might play a scale with the following left-hand fingering. Notice the right-hand fingering at the string crossings:
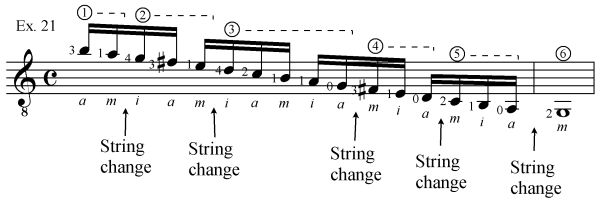
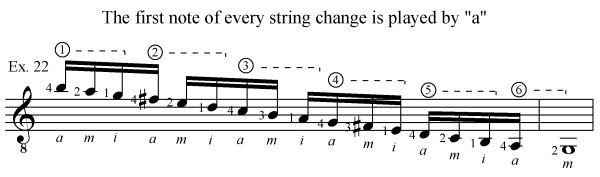
Kudos to Maestro Yepes for his command of the technique. But changing strings in the middle of “ami” is very difficult to control. The way I prefer to finger scales using the “ami” pattern is to finger them so the “a” finger begins the first note on each new string:
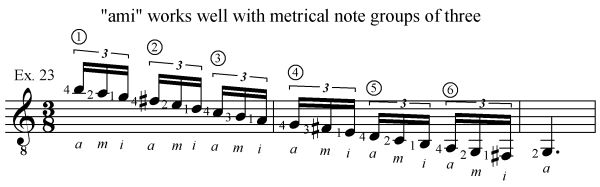
Although executing the string crossings is far easier with this method of fingering, it has a downside. If the notes are supposed to be played in groups of threes, no problem. That comes naturally with the “ami” pattern.
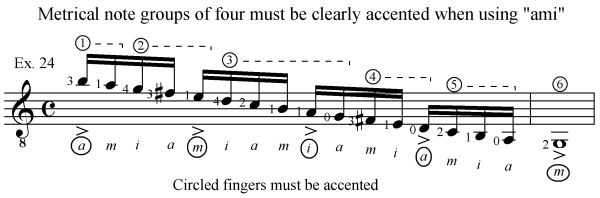
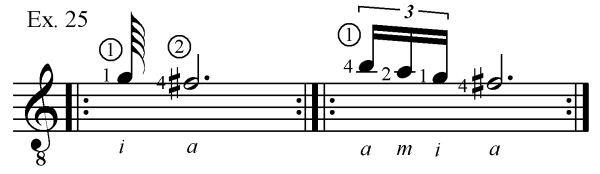
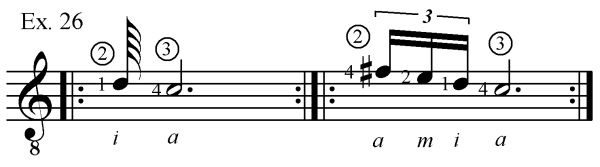
But what if the notes are supposed to be played in groups of four? You must take particular care to accent the fingers that play on the beats:
It is at the string crossings that scales often fall apart, whether done with the traditional “im” rest stroke or the “ami” rest stroke. Therefore, it is important to practice each string cross individually as a speed burst. In the method I use to finger “ami” scales, string crossings are always done from “i” to “a” whether ascending or descending.
I will use the scale from Ex. 23 to illustrate how to practice and master string crosses. The first string cross is the G to F#, first string to second string. Practice it as a speed burst. Then practice the “ami” group plus the string cross:
Then move on to the next string cross, D to C from the second to the third string. Practice it as a speed burst. Then practice the “ami” group plus the string cross:
Continue working through the scale in the same manner. As you master more groups, combine them into larger groups and gradually build the entire scale.
Watch as I demonstrate in video clip #18:
Real-life applications of the “ami” pattern
Let’s take the opening scale of Villa-Lobos’ Etude No. 7. If I use traditional “im” rest stroke, the fingering might look like this:
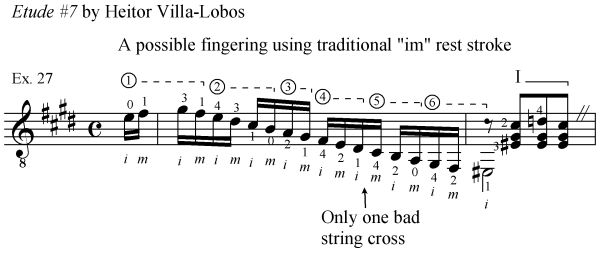
Notice that by beginning with “i” and using this left-hand fingering, I get all good string crosses on the right hand except one. It works very well.
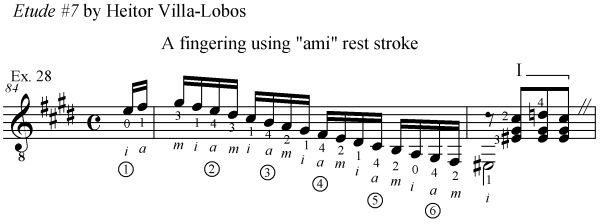
If I were going to use “ami” I would instead finger it like this—notice that the new string at each string crossing is played with “a”:
Here is the procedure I would use to learn this scale using speed bursts.
Watch as I show you how to do it in video clip #19:
Let’s look again at the scale from the finale of Fernando Sor’s Variations on a Theme by Mozart. It lends itself particularly well to the “ami” pattern:
Here is how I would work on the passage with speed bursts.
Watch this one (video clip #20):
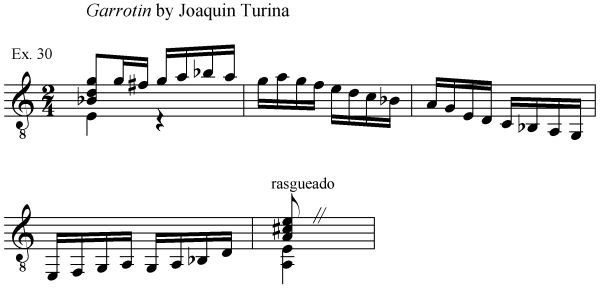
The “ami” fingering is not musically appropriate for all scale passages. For instance, in flamenco-based repertoire such as the Garrotin by Joaquin Turina, this passage is more effective with the tak-a tak-a attack of “im” rest stroke:
On the other hand, I find that the obviously flamenco-based Concierto de Aranjuez by Joaquin Rodrigo lends itself to both techniques. The aggressive flamenco-style scales of the first movement are best played with “im” rest stroke. But the scales in the third movement sound better, are far easier to play, more secure, and more dependably executed with “ami” rest stroke than “im” rest stroke.
Several specialty pieces in the repertoire such as the Passapie by Salvador Bacarisse (written for Narciso Yepes) have passages particularly suitable for the “ami” technique.
Watch as I play a passage from Passapie in video clip #21:
As with most techniques, the choice of when and how to use the “ami” scale technique is determined by the music itself and the effect desired. If a fast scale passage requires minimal accentuation of the individual beats of the meter, “ami” works very well. If extreme scale velocity with minimal effort is required, the “ami” pattern is hard to beat. In general it is also easier and faster to learn a high-velocity scale passage with “ami” than the traditional “im” pattern. That said, “im” rest stroke is still the major player in the fast scale race. In passages with notes grouped in twos and fours or where a punchy sound is desired, “im” is the pattern of choice.
PDFs and Video Downloads
You may download a PDF version of this technique tip.
Download Fast Scales With ami
Note: You must have Adobe Reader 10 or later installed on your computer to play the videos contained in the PDFs. Download Adobe Reader here.